Wellington:
(04) 801 6228
Lower Hutt:
(04) 570 0520
If "root canal" makes you wince before you've even thought about the price, you're far from alone — and the good news is that the reality is gentler than the reputation. On cost: a root canal in NZ usually runs $900 to $2,000 depending on the tooth, and there's often a crown to follow, which adds to the total. This page explains what you're actually paying for, why a root canal is rarely the ordeal people expect, and how it stacks up against simply pulling the tooth — so you can decide with the full picture.
The fear around root canals mostly comes from a time before modern techniques. Here's what actually happens now.
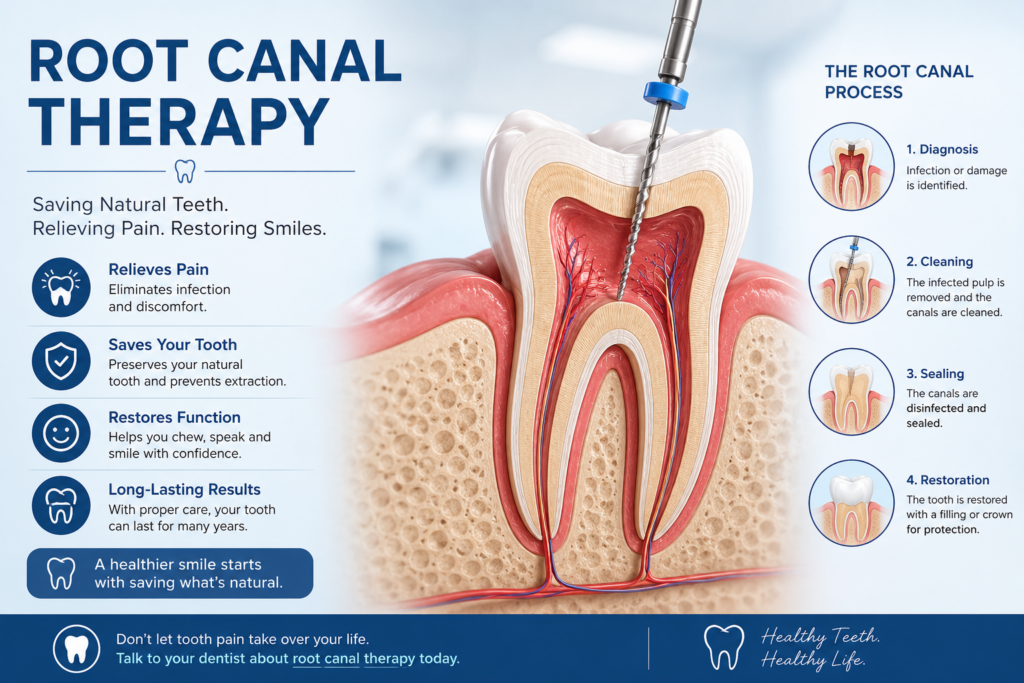
A tooth has a soft centre. When that centre gets infected or damaged — usually from deep decay or a crack — it causes pain. A root canal removes the infected tissue from inside the tooth, cleans the space out, and seals it. The tooth stays; only the troublesome inside is dealt with.
The thing people get wrong: a root canal isn't what causes the pain — it's what relieves it. You arrive in pain from the infection, and the treatment takes that away. With proper numbing, most people find it much like having a filling, just a longer appointment. If you're anxious about it, that's completely understandable, and it's something to tell us so we can make it easier — not something to be embarrassed by.
The plain numbers:
Front tooth (single canal): roughly $900 to $1,300
Premolar: roughly $1,200 to $1,600
Molar (more canals, more complex): roughly $1,500 to $2,000+
Back teeth cost more than front teeth for a simple reason: they have more canals inside, so there's more to clean and seal, and the work is more intricate. The condition of the tooth and whether a specialist is needed for a tricky case also affect the figure. As always, a proper look gives you the real number rather than a guess.
When a tooth is badly infected, you've broadly got two paths, and it's worth weighing them honestly rather than just reaching for the cheaper one.
Pulling the tooth is cheaper up front — an extraction is a few hundred dollars. But you're then left with a gap, and gaps have their own costs: nearby teeth can shift, chewing changes, and if you later want to fill the space, an implant or bridge costs considerably more than the root canal would have.
Keeping the tooth with a root canal costs more now but saves the natural tooth, which is almost always the better long-term result. Your own tooth, kept, beats most replacements.
There are times when extraction is the sensible call — a tooth too damaged to save, for instance. The point isn't that one is always right. It's that the cheaper option today can be the more expensive one over the years, and you deserve to see both sides before choosing.
This catches people out, so it's worth being upfront. A tooth that's had a root canal is more brittle than a healthy one, especially a back tooth doing heavy chewing. A crown — a cap over the whole tooth — protects it from cracking and lets it last.
So the honest total for a back tooth is often the root canal plus a crown, which might add $1,200 to $2,000 again. We'd rather you knew that from the start than discovered it later. Sometimes the crown can wait a little; sometimes it's needed promptly — we'll explain which applies to your tooth. Our crowns page has more on that side.
Comfort is mostly about good numbing, taking the time to do it properly, and you being in control. You can raise your hand any time you want us to pause, and we stop — no pushing through. We'll talk you through what's happening as we go if that helps, or keep it quiet if you'd rather not know the play-by-play.
If dental nerves are the real barrier here, that's worth a read on its own — we've written about how we help anxious patients, because getting that right matters more than the procedure itself.
If you'd like to see how we approach root canals, our root canal therapy page is the place to look. Have a read whenever you're ready, and ask us anything that's on your mind.
If you're looking into wisdom teeth removal cost in NZ, here's the straight answer up front: a simple extraction usually runs $250 to $450 per tooth, while a surgical removal of an impacted wisdom tooth can be $600 to $1,200 or more per tooth. The reason for the wide gap is the kind of removal involved, and this guide walks through that plainly — including the part most cost guides skip, which is that not every wisdom tooth actually needs to come out.
If you're experiencing pain or swelling while researching costs, it's also worth reading our Emergency Dentist in Wellington guide before deciding whether treatment should wait.
It's worth saying clearly, because it isn't always said: plenty of wisdom teeth are perfectly fine left where they are.
If a wisdom tooth has come through cleanly, isn't causing pain, can be kept clean, and isn't crowding anything, there's often no reason to remove it. Removing a healthy, problem-free tooth just because it's a wisdom tooth isn't necessary.
Removal genuinely makes sense when a tooth is causing trouble: repeated pain or infection, decay that can't be cleaned or filled, a tooth stuck (impacted) against its neighbour, or a partly-erupted tooth that keeps catching food and flaring up. The honest approach is to look at your particular teeth and decide based on what they're doing, not on a rule that says everyone's must go.
If you're unsure whether your wisdom teeth are actually causing problems, our Wisdom Teeth Assessment page explains what we look for during your consultation.
This is the single biggest factor in the cost, so it's worth understanding the difference.
A simple extraction is for a wisdom tooth that has fully come through and is sitting in a normal position. It can be removed much like any other tooth — relatively quick, usually under local anaesthetic.
A surgical extraction is needed when a tooth is impacted: stuck under the gum, lying at an angle, or tangled up with the bone or the nerve nearby. This takes more — sometimes a small incision, sometimes removing the tooth in pieces — so it costs more and takes longer to do. A scan beforehand shows exactly what's going on, which is how the right approach (and the right price) gets worked out.
If advanced imaging is required, we may recommend a 3D CBCT scan before treatment to assess the position of the tooth and nearby nerves safely.
The plain numbers:
What moves the price:
A quote after an examination and any necessary X-rays or scans is the only way to accurately estimate the cost for your mouth.
If a wisdom tooth problem is caused by an accident — a knock or injury — ACC may contribute, and it's always worth checking. Routine removal for decay or impaction generally isn't covered by ACC, as that's not accident-related.
Private health insurance with dental cover may contribute depending on your policy, so it's worth checking with your insurer. For patients under 18, some treatment may be covered under the government's publicly funded dental care programme. We can explain what applies during your consultation.
For a simple extraction, most people are back to normal within a few days — some swelling and tenderness, managed with rest, soft food, and ordinary pain relief.
A surgical removal takes a little longer, often up to a week, with more swelling during the first few days. The usual advice is to rest, use cold compresses early on, eat soft foods, and avoid smoking or disturbing the area while it heals.
We'll provide detailed after-care instructions and let you know what's normal, what to expect, and when you should contact us.
Every wisdom tooth is different. Some can remain healthy for life, while others are much easier to remove before they create pain, infection or damage to neighbouring teeth.
If you'd like to know what's happening with yours, our Wisdom Teeth Removal page explains the treatment in more detail. If you're already experiencing discomfort, you may also find these guides helpful:
If you're ready, you can also book a consultation at either our Wellington or Lower Hutt clinic and we'll assess your wisdom teeth, explain your options, and provide an accurate quotation based on your individual situation.
If you're thinking about porcelain veneers in NZ, the two things you most want to know are what they'll cost and how long they'll last. Plainly: porcelain veneers usually run between $1,200 and $2,500 per tooth here, and well-made ones last around 10 to 15 years, sometimes longer. But veneers are also a permanent change to your teeth, so the bigger question is whether they're the right choice for you — and the best part of the process now is that you can see your new smile before you commit to anything. This page covers all of it, honestly.
What veneers are and what they fix
A veneer is a thin shell of porcelain bonded to the front of a tooth. Think of it as a new front surface that sits over what's there.
Veneers are mostly a cosmetic fix. People choose them for teeth that are discoloured and won't whiten, chipped or worn at the edges, slightly crooked or gappy, or just an uneven shape they'd like evened out. A few veneers can change how a whole smile looks. What they don't do is fix underlying problems — a tooth that needs other treatment gets that sorted first. Veneers go on a healthy foundation.
Porcelain veneers vs composite bonding
These two get compared a lot, and it's a fair comparison because they solve overlapping problems in different ways.
Composite bonding uses a tooth-coloured resin applied directly to the tooth and shaped in a single visit. It's cheaper, faster, and usually involves little or no removal of your natural tooth, which means it can often be undone. The trade-offs: it doesn't last as long (around 5 to 7 years), and it can stain and chip more easily than porcelain.
Porcelain veneers are custom-made in a lab and bonded on, so they take more than one visit and cost more. In return they're stronger, more stain-resistant, and look more like natural tooth, and they last longer.
For a small chip or one tooth, bonding is often the sensible choice. For a fuller change you want to last, porcelain tends to earn its cost. Neither is the "right" answer in the abstract — it depends on what you're fixing. Our composite bonding page goes into bonding in more detail if that's where you're leaning.
How much veneers cost in NZ
The honest ranges:
Porcelain veneer: roughly $1,200 to $2,500 per tooth
Composite bonding: roughly $250 to $600 per tooth
A full set of veneers (six to ten teeth across the smile): the per-tooth cost multiplied, so it's a significant total — worth planning for as real money and time
Price per tooth varies with the complexity of your case and the lab work involved. Because veneers are usually done across several teeth for an even result, the total adds up, which is exactly why seeing the plan and the projected outcome first matters so much.
How long veneers last and how to care for them
Porcelain veneers generally last 10 to 15 years, and often longer with good care. They don't need anything exotic — brush and floss as normal, keep up your regular check-ups, and they look after themselves.
A couple of honest cautions. Veneers can chip if you bite hard things (ice, pens, fingernails) or grind your teeth — if you grind, a nightguard protects them. And because a small amount of natural tooth is usually removed to fit them, that step can't be reversed; once you have veneers, you'll have veneers (or a replacement) on those teeth from then on. Worth knowing before you decide, not after.
Seeing your smile before you commit (Digital Smile Design)
This is the part that changes the experience. Using Digital Smile Design, we can show you a preview of how your smile would look with veneers before any work is done. You see it on screen — the shape, the proportions, how it sits with your face — and you get to say whether that's the result you want.
It means you're not committing to a permanent change on trust. You're looking at the likely outcome and deciding from there. For a choice that's irreversible, being able to see it first is the difference between hoping and knowing. More on how that works on our Digital Smile Design page.
How to choose a veneers dentist
A few honest things to look for. Ask whether you can see a preview of the result before committing. Ask how many teeth they'd treat and why — a good dentist treats what genuinely needs it, not as many as possible. Ask what the veneers are made of and how long they're expected to last. And notice whether they explain the irreversible part plainly, or gloss over it.
The right dentist will be straight with you about all of this, lay out your options, and leave the decision with you. That's the conversation worth having.
If you'd like to see how we approach veneers, our porcelain veneers page is the place to start. No rush — have a read, and come in for a look when you're ready.
As parents, we all wish for our children to have sparkling, healthy smiles. Yet, despite our best efforts, tooth staining can occur even in the youngest of mouths, leaving many parents puzzled and concerned. Understanding the reasons behind these stains not only demystifies the issue but also empowers parents to take proactive steps in maintaining their children's dental health. Here's an exploration into why children's teeth stain and what can be done to prevent or address it.
The Nature of Tooth Stains in Children
Tooth stains in children can arise from various causes, ranging from dietary choices to oral hygiene habits and even certain medical conditions. These stains are generally categorized into two types: extrinsic and intrinsic.
Common Culprits Behind Extrinsic Stains
Extrinsic stains are children's most common type of tooth discoloration and can usually be addressed with improved dental hygiene or dietary changes.
Delving Into Intrinsic Stains
Intrinsic stains are less common but typically more challenging to address, often requiring professional dental treatment.
Prevention and Management: Keeping Children's Teeth Bright
While some causes of tooth staining are out of our control, many can be managed with preventive care and good dental hygiene practices.
Addressing Existing Stains
For existing stains, particularly intrinsic ones, professional dental advice and treatment are essential. Treatments can range from professional cleanings for extrinsic stains to more involved procedures like dental veneers or bonding for intrinsic discoloration. The choice of treatment depends on the cause of the staining and the child's overall dental health.
The Role of Parents and Caregivers
Parents play a crucial role in preventing and addressing tooth staining in children. Parents can significantly mitigate the risk of tooth discoloration by fostering good eating habits, ensuring proper oral hygiene, and maintaining a schedule of regular dental visits. Additionally, being observant and proactive in seeking dental advice when stains are noticed can make a substantial difference in the outcome.
Conclusion: Bright Smiles Ahead
While tooth staining in children can cause concern, understanding its reasons offers a pathway to prevention and treatment. By taking proactive steps in diet, hygiene, and dental care and consulting with dental professionals when necessary, parents can help ensure their children's smiles remain bright and healthy. Remember, the goal is not just aesthetic; a healthy smile is critical to a child's overall well-being and confidence.

Flossing—some people swear by it, while others skip it altogether. With so many mixed opinions and conflicting reports on whether flossing actually works, you might be wondering: Is flossing really worth it? The short answer? Yes! But let’s break down why flossing matters and whether it’s a necessary step in your oral care routine.
Flossing removes plaque, food particles, and bacteria from between your teeth and under the gumline—areas that a toothbrush simply can’t reach. If these particles are left behind, they contribute to tooth decay, gum disease, and bad breath.
Yes! While some headlines have suggested that there’s "no solid evidence" that flossing helps, the reality is:
So why the confusion? Some studies say that improper flossing techniques make flossing less effective—but that doesn’t mean it doesn’t work! It just means flossing correctly is key.
Skipping flossing isn’t just about getting food stuck between your teeth. It can lead to:
Not a fan of traditional floss? Here are some alternatives:
✅ Absolutely! Flossing helps prevent cavities, gum disease, and bad breath—saving you from costly dental treatments down the road. Even if you don’t see immediate results, your gums and teeth will thank you in the long run!
Do you floss daily, or are you trying to build the habit? Let us know in the comments!
Flossing is important, but what if there was an easier way to clean between your teeth? Interdental brushes are a fantastic alternative to traditional floss, making it easier to remove plaque and food debris from hard-to-reach areas. But did you know that there are different types of interdental brushes, each designed for specific dental needs?
In this guide, we’ll break down the types of interdental brushes, their benefits, and how to choose the right one for your teeth.
An interdental brush is a small brush designed to clean between teeth, where toothbrushes can’t reach. Unlike string floss, which relies on scraping, an interdental brush physically sweeps away plaque and debris with its bristles.
These brushes come in various shapes, sizes, and materials, making them a great option for people with braces, gum disease, or wider gaps between teeth.
✅ Best for: Evenly spaced teeth, beginners
🔹 These brushes have a uniform cylinder shape with bristles evenly distributed around a straight wire.
🔹 Ideal for general cleaning between teeth with minimal gaps.
🔹 Easier to control for people new to interdental brushes.
✅ Best for: Teeth with varying gaps, gum recession
🔹 Features a cone-shaped tip that gradually narrows at the end.
🔹 Perfect for people with uneven gaps or those experiencing gum recession.
🔹 Provides deeper cleaning in areas where gums have pulled away from the teeth.
✅ Best for: Tight gaps, people transitioning from floss
🔹 These have extra-fine bristles and a slim wire, making them perfect for tightly spaced teeth.
🔹 A great alternative for those who find floss difficult to use but don’t have large gaps between their teeth.
🔹 Recommended for people with healthy gums and no major spacing issues.
✅ Best for: Wide gaps, missing teeth, bridges
🔹 Designed for people with larger spaces between their teeth due to missing teeth or previous dental work.
🔹 The bigger bristles provide thorough plaque removal in hard-to-reach areas.
🔹 Beneficial for those with gum disease or periodontal issues.
✅ Best for: Back teeth, hard-to-reach areas
🔹 These brushes have a bent handle or an angled head, making them great for cleaning molars and back teeth.
🔹 Ideal for people who struggle with dexterity or mobility issues.
🔹 Provides better access to deep gum pockets for those with gum disease.
✅ Best for: Braces, implants, people with reduced hand mobility
🔹 Features a bendable handle, allowing better control when maneuvering around braces, implants, or crowns.
🔹 Helps people with arthritis or other hand mobility issues who struggle with traditional floss or brushes.
🔹 Provides customizable angles for different areas of the mouth.
✅ Yes! They are highly effective for cleaning between teeth, especially for people with braces, gum issues, or those who find flossing difficult.
🔹 They remove more plaque than floss alone
🔹 They help prevent gum disease and cavities
🔹 They are easier to use than string floss for many people
If you struggle with traditional flossing, interdental brushes might be the perfect solution for your oral hygiene routine!
💬 Do you use interdental brushes? What’s your experience with them? Let us know in the comments!
Electric toothbrushes have gained popularity as a superior alternative to manual brushing. But with so many options on the market, how do you know which one is best for your needs? From oscillating to sonic technology, smart features to different brush head designs, the differences in electric toothbrushes can significantly impact your oral health.
In this guide, we’ll break down the main types of electric toothbrushes, their key differences, and how to choose the right one for your smile.
Not all electric toothbrushes work the same way. The two most common types are:
✅ Best for: Plaque removal, people who prefer a smaller brush head
🔹 Features a small, round brush head that oscillates (rotates back and forth) to clean each tooth individually.
🔹 Typically makes 7,000–8,800 rotations per minute, helping to remove plaque more effectively than manual brushing.
🔹 Some advanced models offer 3D cleaning, which adds a pulsing motion to help break up plaque.
🔹 Popular brands: Oral-B, Philips Sonicare (some models)
✅ Best for: Sensitive teeth, deeper cleaning between teeth
🔹 Uses high-frequency vibrations to create rapid brush strokes (typically 30,000–60,000 strokes per minute).
🔹 The vibrations create tiny bubbles in toothpaste and saliva, allowing the brush to clean beyond where the bristles physically reach.
🔹 Often has larger brush heads, similar to traditional manual toothbrushes.
🔹 Popular brands: Philips Sonicare, Burst, Colgate Hum
✅ Best for: People with gum disease, extremely sensitive teeth
🔹 Uses ultrasonic waves (instead of mechanical brushing) to break apart plaque and bacteria.
🔹 Vibrates at an incredibly high frequency (1.6 MHz or over 190 million movements per minute!).
🔹 Does not rely on physical scrubbing—ideal for people who find regular brushing uncomfortable.
🔹 Popular brands: Emmi-Dent, Smilex
✅ Best for: Those looking for maximum cleaning power
🔹 Combines oscillating-rotating and sonic technology to provide a more thorough clean.
🔹 Offers the benefits of plaque removal (oscillation) and deep cleaning (sonic vibrations).
🔹 Popular brands: Oral-B iO Series
| Feature | Oscillating-Rotating | Sonic | Ultrasonic | Dual-Technology |
|---|---|---|---|---|
| Movement Type | Rotates + Pulsates | Vibrates | Uses sound waves | Rotates + Vibrates |
| Speed (Strokes per Minute) | 7,000–8,800 | 30,000–60,000 | 190 million+ | Varies |
| Best for | Plaque removal, focused cleaning | Deeper cleaning between teeth | Gum disease, sensitive gums | All-in-one |
| Brush Head Size | Small, round | Larger, rectangular | Similar to sonic | Varies |
| Cleaning Effectiveness | High | High, with better fluid motion | Effective without physical contact | Maximum |
✅ Yes! Studies show that electric toothbrushes remove significantly more plaque than manual ones and reduce the risk of gum disease.
🔹 If you want better cleaning, ease of use, and improved oral health, investing in an electric toothbrush is definitely worth it.
🦷 Do you use an electric toothbrush? Which type do you prefer? Share your experience in the comments!
Brushing your teeth is one of the most important habits for maintaining a healthy smile, but how often should you actually clean them? Once? Twice? After every meal? With so much advice floating around, it’s easy to get confused.
In this blog, we’ll break down how often you should brush, floss, and use mouthwash—and why timing matters for your oral health.
According to the American Dental Association (ADA) and most dentists worldwide, you should brush at least twice a day—once in the morning and once before bed.
🦷 Morning Brushing: Removes plaque and bacteria that build up overnight and helps freshen your breath for the day ahead.
🌙 Nighttime Brushing: Cleans away food particles, plaque, and bacteria that have accumulated throughout the day, preventing cavities and gum disease while you sleep.
🚨 Skipping nighttime brushing is one of the worst things you can do for your teeth! While you sleep, your saliva production decreases, which allows bacteria to thrive and cause decay if your teeth aren’t clean.
Brushing after meals might seem like a good idea, but it depends on what you eat.
✔️ Good times to brush after eating:
⚠️ When NOT to brush right away:
🧵 Flossing should be done at least once a day!
Yes! Mouthwash is a great addition to your oral care routine, but it’s not a substitute for brushing or flossing.
✅ Use an antibacterial or fluoride mouthwash once or twice a day to:
✔ Kill bacteria and freshen breath
✔ Strengthen enamel and prevent cavities (fluoride mouthwash)
✔ Help reduce gum inflammation (antiseptic mouthwash)
🚨 Avoid using mouthwash immediately after brushing, as it may wash away the fluoride from your toothpaste. Wait at least 30 minutes or use it at a different time of day.
🪥 Change your toothbrush (or toothbrush head) every 3 to 4 months or sooner if:
🦷 Brush: Twice a day (morning and night)
🧵 Floss: At least once a day (preferably at night)
💦 Mouthwash: Once or twice a day (after meals or before bed)
🚰 Rinse with water: After acidic foods/drinks instead of brushing immediately
By following this routine, you’ll keep your teeth healthy, strong, and cavity-free!
👉 Do you brush twice a day, or do you brush more often? Let us know in the comments!
A bright, white smile is something many people strive for, which is why over-the-counter (OTC) teeth whitening products have become incredibly popular. From whitening toothpaste to strips and LED kits, retail stores offer a wide range of products promising dazzling results at a fraction of the cost of professional whitening. But do these products really work, or are they just clever marketing?
Let’s dive into the science behind these whitening products and whether they live up to the hype.
Most OTC whitening products contain hydrogen peroxide or carbamide peroxide, which help break down stains on the enamel. However, the strength and effectiveness of each product vary.
✅ Best for: Surface stains, daily maintenance
🔹 Contains mild abrasives and small amounts of peroxide or baking soda to remove surface stains.
🔹 Does not change the natural color of your teeth—only removes external stains caused by coffee, tea, wine, and smoking.
🔹 Ideal for maintaining results after professional whitening.
💡 Does it work?
✔️ Mildly effective for stain removal but won’t provide dramatic whitening results.
✅ Best for: Gradual whitening at home
🔹 Thin, flexible plastic strips coated with a peroxide-based whitening gel.
🔹 Typically used for 30 minutes daily over 1–2 weeks.
🔹 Can lighten teeth by 1–3 shades over time.
💡 Does it work?
✔️ Yes, but results take time. Whitening strips can be effective for mild to moderate stains, but they may not remove deep discoloration.
🚨 Downsides:
⚠️ Can cause tooth sensitivity and gum irritation with overuse.
⚠️ Uneven whitening can occur if strips don’t fit perfectly on teeth.
✅ Best for: Mild stain prevention and maintenance
🔹 Contains low concentrations of hydrogen peroxide to help lighten surface stains over time.
🔹 Needs to be swished in the mouth for 60 seconds daily to work.
🔹 Typically takes several weeks or months to notice slight changes.
💡 Does it work?
❌ Not very effective. The short contact time with teeth makes it difficult for the ingredients to penetrate deeply and whiten effectively.
✅ Best for: Quick touch-ups, on-the-go whitening
🔹 A small brush or pen applicator that applies whitening gel directly to teeth.
🔹 Convenient for travel or quick touch-ups before events.
💡 Does it work?
✔️ Yes, but only temporarily. Whitening pens don’t provide long-lasting results, and they work best as a quick fix for minor stains.
✅ Best for: Faster results at home
🔹 These kits come with whitening gel and an LED light that supposedly enhances peroxide penetration.
🔹 Used for 10–30 minutes daily over 1–2 weeks.
💡 Does it work?
✔️ Yes, to some extent. The peroxide in the gel does the whitening; the LED light mostly accelerates the process rather than making it more effective.
🚨 Downsides:
⚠️ Can cause sensitivity if used too often.
⚠️ Results vary—some people see noticeable whitening, while others don’t.
| Feature | Store-Bought Whitening | Professional Whitening (Dentist) |
|---|---|---|
| Strength | Lower peroxide levels (3–10%) | Higher peroxide levels (15–40%) |
| Speed | Takes 1–2 weeks for results | Results in one session |
| Effectiveness | Can whiten 1–3 shades | Can whiten 5–8 shades |
| Longevity | Results last a few months | Can last 1–3 years with maintenance |
| Cost | $10–$100 | $300–$1,000+ |
✔ Yes, if:
❌ No, if:
🔹 Whitening strips and LED kits offer the best results for at-home whitening.
🔹 Toothpaste and mouthwash are more for maintenance rather than dramatic whitening.
🔹 For stubborn stains or fast whitening, professional treatments are the way to go.
👉 Have you tried store-bought whitening products? What worked for you? Let us know in the comments!
Late-night snacking is tempting, but did you know that what and when you eat before bed can significantly impact your oral health? Many people brush their teeth and then sneak in a midnight snack without realizing they’re setting the stage for cavities, enamel erosion, and gum disease.
So, when should you stop eating at night to keep your teeth healthy? Let’s break it down.
When you eat, bacteria in your mouth break down sugars and starches, producing acids that can attack your tooth enamel. Normally, your saliva helps neutralize these acids, but at night, saliva production decreases, making your teeth more vulnerable to decay.
If you eat too late and don’t properly clean your teeth afterward, food particles stay in your mouth overnight, feeding harmful bacteria and increasing your risk of cavities, plaque buildup, and bad breath.
✅ Ideally, stop eating at least 1–2 hours before bedtime.
This gives your saliva time to wash away leftover food particles and neutralize acids before you sleep. If you brush your teeth immediately after eating, it’s even better to wait 30 minutes after your last meal before brushing.
🚨 Worst case scenario: Eating right before bed and not brushing your teeth afterward. This allows food particles and bacteria to sit on your teeth for 8+ hours, accelerating enamel erosion and tooth decay.
If you do eat late, try to avoid:
❌ Sugary Snacks (cookies, candy, ice cream) – Feeds cavity-causing bacteria.
❌ Sticky or Chewy Foods (gummy candies, dried fruit) – Gets stuck between teeth.
❌ Acidic Foods & Drinks (citrus, soda, wine) – Weakens enamel.
❌ Starchy Foods (chips, bread, pasta) – Turns into sugar, fueling bacteria.
If you must eat late, choose foods that are low in sugar and non-acidic:
✔ Cheese – Increases saliva and helps remineralize enamel.
✔ Yogurt – Contains probiotics that support gum health.
✔ Nuts – Low in sugar and can help clean teeth.
✔ Raw Vegetables (carrots, celery, cucumbers) – Helps remove plaque naturally.
✔ Water – Helps rinse away food particles and neutralize acids.
1️⃣ Stop eating 1–2 hours before bed
2️⃣ Drink water to rinse away food particles
3️⃣ Wait 30 minutes after eating, then brush with fluoride toothpaste
4️⃣ Floss to remove trapped food and plaque
5️⃣ Use an alcohol-free mouthwash for extra protection
🦷 The golden rule: Stop eating 1–2 hours before bed and always brush and floss before sleeping.
Late-night snacking isn’t just bad for your waistline—it can lead to cavities, enamel erosion, and bad breath if you don’t properly clean your teeth afterward. Making small changes to your nighttime routine can keep your teeth strong and healthy for years to come.
👉 Do you snack at night? What’s your go-to late-night snack? Let us know in the comments!